You’ve watched the tutorials. You’ve studied the channels you admire. You sit down to film and what comes out looks nothing like what plays in your head.
The audio echoes. The lighting is uneven. The background has a pile of laundry in the corner. You spend three hours in a video editor trying to salvage it, and at the end, it still looks like a home video.
Here’s the thing nobody tells you early enough: the gap between amateur and professional video quality is almost never about the camera. It’s about the environment you’re shooting in.
This guide breaks down exactly what creates professional-looking video content, what beginners consistently get wrong, and how you can produce high-quality YouTube and Instagram videos without spending lakhs on equipment.
Why Most Beginner Videos Look Amateur (It’s Not the Camera)
Before we talk about solutions, let’s be honest about the problem.
Most beginner creators assume that a better camera will fix their video quality. So they save up, buy a Sony or a Canon, and film their next video, and it still looks off. The lighting is still flat. The audio still has that hollow bedroom echo. The background still looks like a random corner of their apartment.
The camera was never the bottleneck.
What separates a video that looks like it belongs on a professional YouTube channel from one that doesn’t is a combination of three things: controlled lighting, clean audio, and a purposeful background. None of those require an expensive camera. All of them require intention and the right space.
Common Mistakes Beginners Make in Video Creation
Understanding what goes wrong is the fastest way to fix it. Here are the mistakes that hurt quality the most:
Shooting against a window Natural light from behind you looks great but only until a cloud passes or the angle shifts. Shooting with a window behind you creates silhouetting that no video enhancer can fully correct in post.
Recording in rooms with hard surfaces Kitchens, bathrooms, and bare-walled rooms create reverb. Even a good microphone sounds bad in an echo-prone space. Acoustic treatment matters far more than microphone cost.
No shot planning Walking into a shoot without a shot list leads to disorganized footage, missed angles, and hours of unnecessary editing. Knowing what you need before you press record saves enormous amounts of time in post.
Ignoring white balance Mixing warm and cool light sources creates color casts that look unprofessional. Most creators don’t notice it until they’re trying to color-correct in their video editor by which point it’s very difficult to fix.
Exporting at the wrong settings A beautifully shot video can look terrible if exported at the wrong resolution or bitrate. Always export to the platform’s recommended specifications.
Not adding subtitles, the majority of social media video is watched without sound. Creators who skip captions are invisible to a massive portion of their potential audience.
What You Actually Need for Professional-Looking Videos
Let’s break down the four pillars of video quality and what “good enough” looks like for each.
- Lighting
Lighting is the single highest-leverage investment in video production. It affects everything: skin tones, background separation, perceived sharpness, and mood.
What works:
- Key light: Your primary light source, positioned at 45 degrees to your face
- Fill light: A softer light on the opposite side to reduce harsh shadows
- Backlight or rim light: Separates you from the background, creating depth
You don’t need cinema-grade gear to achieve this. A pair of softboxes or LED panels in the ₹3,000–₹8,000 range each can do the job but they need to be positioned correctly, in a space with enough room to set them up properly. In a cramped bedroom, even good lights produce mediocre results.
- Audio
Audio quality has a direct and measurable impact on watch time. Viewers leave videos with bad audio within the first 30 seconds. They’ll tolerate lower video resolution before they’ll tolerate distracting background noise or echo.
What works:
- A directional shotgun mic or a lavalier (lapel) mic
- A quiet room with soft surfaces (carpets, curtains, foam panels)
- Monitoring your audio levels before you shoot not after
A professional podcast studio or video studio is acoustically treated specifically to solve this problem. You can record in one and hear the difference immediately.
- Background
Your background is visual context. It tells the viewer, before you say a single word, whether to take you seriously.
Options from most to least flexible:
- Green screen: Drop in any virtual background in post-production. Maximum creative control.
- Designed studio set: A physical backdrop or styled wall that looks clean and branded.
- Plain colored backdrop: Simple, distraction-free, professional.
- Your home: Works if carefully styled, but requires consistent effort and often looks inconsistent across videos.
- Camera Setup
Your camera matters less than everything above but here’s what to keep in mind:
- A modern smartphone on a tripod with good lighting will beat a DSLR in a poorly lit room every single time.
- Shoot in 1080p at minimum. 4K is preferable if your platform supports it and your storage allows.
- Use manual settings if your camera allows it. Auto mode will hunt for focus and exposure, especially when you move.
- Eye-level framing is the default for talking-head content. Looking down at the camera reads as unprofessional. Use a tripod or stack your laptop on books.
Home Setup vs. Studio Setup: A Practical Comparison
| Factor | Home Setup | Professional Studio |
| Lighting | Variable natural light shifts, limited control | Consistent, adjustable, professional-grade |
| Audio | Echo-prone, affected by ambient noise | Acoustically treated, mic-ready |
| Background | Requires styling every shoot | Ready-to-use — minimal, branded, or green screen |
| Space | Often cramped, limits camera angles | Spacious, designed for video production |
| Equipment | You buy, maintain, and set up everything | Included in booking — walk in and shoot |
| Setup Time | 30–90 minutes per session | Near zero — space is always ready |
| Upfront Cost | ₹30,000–₹1,50,000+ to build properly | Pay only for what you use, when you use it |
| Consistency | Hard to replicate session to session | Identical conditions every time you book |
The math for a home studio only makes sense if you’re shooting 15–20+ days per month. For most creators and brands producing 2–8 videos monthly, renting a professional space is significantly more cost-effective.
Why Renting a Studio Is Smarter Than Building Your Own Setup
Cost Savings That Actually Add Up
A proper home studio costs more than most creators expect. Here’s a realistic breakdown:
- LED panel lights (×2): ₹10,000–₹20,000
- Light stands and modifiers: ₹5,000–₹10,000
- Condenser or shotgun microphone: ₹8,000–₹20,000
- Backdrop stand and paper/vinyl: ₹6,000–₹15,000
- Acoustic panels: ₹8,000–₹20,000
- Tripod and fluid head: ₹5,000–₹15,000
Total: ₹42,000–₹1,00,000+ and that’s before you factor in a camera body if you don’t own one.
Compare that to booking a fully equipped content studio by the hour or half-day. You spend a fraction of the cost, get better gear than you’d buy at that budget, and carry no maintenance or storage overhead.
Professional Output from the First Take
When your environment is right, your footage is right from the beginning. You’re not spending hours in post trying to color-correct uneven lighting or run noise reduction on a reverby audio track. Your video editor work becomes about creativity and storytelling not damage control.
Time Efficiency at Scale
For brands and agencies producing content regularly, time is often more valuable than money. A plug and play studio compress a 3-hour shoot-day setup into a 10-minute check-in. That means more content produced per day, and more energy left for the actual creative work.
Types of Content You Can Create in a Professional Studio
YouTube Videos
Long-form content for YouTube demands consistent quality because viewers are spending 10, 20, sometimes 60+ minutes with your content. Lighting that shifts mid-video, audio that degrades when you move, or a background that changes between episodes all undercut your credibility. A dedicated video studio gives you the consistent environment that helps retain subscribers.
Instagram Reels
Reels are short, fast, and visually judged in the first second. A professional reel studio with aesthetic backdrops, clean lighting, and enough space to move gives your content the production value that makes people stop scrolling. You can typically shoot 5–10 reels in a single session, giving you weeks of content from one booking.
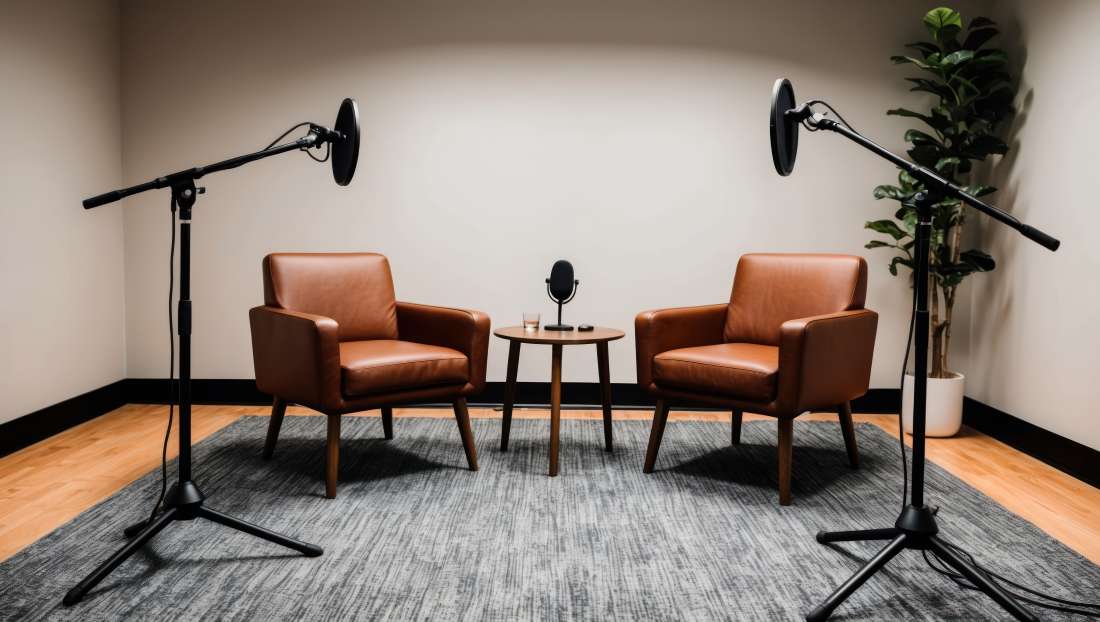
Podcasts
Audio quality is non-negotiable for podcasting. An acoustically treated podcast studio with a professional microphone setup means your episodes sound clear and broadcast-quality on Spotify, Apple Podcasts, or anywhere else you distribute. Many creators also record video podcasts, uploading the full episode to YouTube and distributing audio separately.
Interviews and Testimonials
Whether you’re conducting a client testimonial, a founder story, or a two-person conversation, an interview studio setup positions both subjects in flattering, even light with a clean background. This format works well for brand content, editorial pieces, and documentary-style YouTube videos.
Product Photography and Videography
E-commerce and D2C brands rely on product visuals for conversions. A dedicated product photography space with controlled lighting lets you shoot clean, consistent product images and videos perfect for websites, Amazon listings, and social media ads.
Tips to Improve Your Video Quality Right Now
Even before your next studio booking, here are changes you can make immediately:
In production:
- Always use a tripod. Handheld footage reads as amateur unless you’re going for a specific aesthetic.
- Record a test clip before your full shoot and review the audio. Fix issues before they happen across 30 minutes of footage.
- Dress your frame intentionally. Remove anything from the background that doesn’t belong.
- Shoot more B-roll than you think you need. It gives your editor options.
In post-production:
- Trim aggressively. If a clip doesn’t contribute to the story, cut it.
- Add music to video strategically background music should support the mood, not fight with the dialogue. Keep instrumental tracks 15–20 dB below your voice.
- Use a video enhancer to standardize color temperature and contrast across clips from different angles or sessions.
- Always add subtitles. Always. For reels, burn them directly onto the video. For YouTube, upload an SRT file.
- Use a video compressor before uploading particularly for Instagram, which degrades video quality aggressively on upload if the file isn’t optimized.
For discoverability:
- Spend as much time on your thumbnail and title as you do on the edit. They determine whether people click.
- Use platform-specific formatting: vertical 9:16 for Instagram reels, 16:9 widescreen for YouTube video.
- Post consistently. The algorithm rewards creators who publish on a schedule.
How AI Tools Are Changing Video Creation
For creators who want to move faster, a new generation of tools is worth knowing about.
An AI video generator can now create basic explainer videos, animated clips, and even talking-head content from text scripts. Tools like Pictory, Runway, and Synthesia are genuinely useful for certain formats particularly for social clips, ad variations, and explainer content where you want a polished output without a full shoot.

That said, AI video tools have clear limitations: they lack authenticity, can’t replicate your personal brand presence, and produce output that’s noticeably synthetic to most viewers. For content where you are the brand YouTube channels, personal brand reels, podcasts there’s no substitute for real footage, shot well.
The smartest workflow combines both: use AI tools for quick social cuts and repurposed content, and use a professional studio session for your high-value hero content.
Conclusion: Great Video Starts Before You Press Record
Learning video editing, mastering how to make a video that holds attention, knowing how to add music to video that enhances without distracting all of this matters. But it matters most when the raw footage you’re working with is good.
And good footage starts with the right environment.
Whether you’re a solo creator building an audience on Instagram, a brand launching a product line, or an entrepreneur recording your first podcast, the fastest path to professional output is a professional space — not a warehouse of equipment you’ll spend months learning to use.
Shoot On Rent in Kasturi Nagar, Bangalore, is a fully equipped plug and play content studio designed for exactly this. Book by the hour. Walk in ready to create.
Frequently Asked Questions
Q1: Can I shoot professional Instagram reels with just a smartphone?
Yes, with the right lighting and background, a modern smartphone is more than capable of producing reel-quality footage. The camera is rarely the limiting factor. What matters more is your lighting setup, a stable tripod, and a clean background. A professional reel studio provides all of this, optimized specifically for vertical content.
Q2: How much does it cost to set up a home video studio?
A functional home studio with proper lighting, acoustic treatment, a decent microphone, and a backdrop typically costs between ₹50,000 and ₹1,20,000 to set up correctly. For creators shooting fewer than 10–15 days per month, renting a professional studio on demand is almost always more economical.
Q3: What is a plug and play studio?
A plug and play studio is a fully equipped production space where everything lights, microphones, backdrops, and camera support gear is set up and ready to use when you arrive. You don’t need to bring your own equipment or spend time on setup. Shoot On Rent operates on this model, letting creators focus entirely on their content.
Q4: Do I need a green screen studio for virtual backgrounds?
Only if you want the flexibility to use custom digital backgrounds in post-production. Green screen works well for tech content, product demos, and creative storytelling where the background itself is part of the visual. For most YouTube and podcast formats, a clean physical backdrop is sufficient.
Q5: What’s the best video editing software for beginners?
For beginners, CapCut (free, mobile and desktop) is excellent for reels and short-form content. DaVinci Resolve (free desktop version) is the most powerful free option for long-form YouTube video editing. Adobe Premiere Pro and Final Cut Pro are industry standards for professionals who need the full feature set.
Q6: How do I make my videos look more cinematic without expensive gear?
Focus on these five things: consistent lighting with at least a two-light setup, a clean or intentional background, stable footage (tripod always), color grading in your video editor to create a unified look, and tight editing that removes anything that slows the pacing. Cinematic quality is more about discipline than equipment.
Q7: Can I record a podcast and YouTube video at the same time?
Absolutely and it’s one of the most efficient content strategies available. Record your podcast as a video session: the audio gets distributed to podcast platforms, and the video goes to YouTube. A single 60-minute studio booking can produce content that distributes across 3–4 platforms simultaneously.
Lorem ipsum dolor sit amet, consectetur adipiscing elit, sed do eiusmod tempor incididunt ut labore et dolore magna aliqua…